My last django post actually got a little bit of publicity-- a mention on Python reddit, and a mention in the Yahoo User Interface blog In the Wild for June 20 article. So I feel a little pressure to produce intelligent, engaging content so as not to disappoint the hordes of new readers I must now have. Unfortunately, the topic of this post is pretty dry. Goodbye, new readers. I'll try to find you another time.
The topic of this post is creating standard blog views. So far, I've created a simple blog application that allows me to log in to an Admin interface and enter blog posts, I added some post metadata such as date and tags, and, last time, I added YUI stylesheets to create a cross browser layout solution. However, until now, my trying-so-hard-to-be-a-real website only had a single front page view with a list of all the blog posts. I needed to add other views, such as a single post view, an archive view, and a tag view. Here are the changes I made to implement these views.
Warning: I am a newbie to Django and web development. I've created this blog series to document my journey in creating a blog application using Django. It does not necessarily represent Django best practices. To the extent of my knowledge, I try to follow Django conventions and philosophies, but I know I must still have a number of violations, particularly in this latest revision. Hopefully, as I learn better ways of doing things, I can post corrections. If you have corrections, please leave a comment.
For a much better example of a Django blog application, see Adam Gomaa's Django blog site source code repository. Though I don't understand everything in there, I've referenced it a number of times while creating my blog site. Update 2008-06-29: I just discovered that James Bennett, a Django contributer, also has blog application source code available online. Seeing as he has written a book on Django, this <sarcasm>might</sarcasm> be a good place to look as well.
models.pyIn my models.py file, I added a slug field to store the last part of the url and a method called get_tag_list to return the tags for the post as a list.
~/src/django/myblogsite/myblogapp/models.py:
import re
from django.db import models

class Post(models.Model):
    title = models.CharField(maxlength=200)
    slug = models.SlugField(maxlength=100)
    date_created = models.DateTimeField()
    date_modified = models.DateTimeField(auto_now=True)
    tags = models.CharField(maxlength=200)
    body = models.TextField()

    def get_tag_list(self):
        return re.split(" ", self.tags)

    def __str__(self):
        return self.title

    class Meta:
        ordering = ["-date_created"]

    class Admin:
passviews.pyIn my views.py file, to the frontpage view, I added a single post view, an archive view by year, an archive view by month, and a tag view. I also added a couple functions to create an archive index and a tag index.
~/src/django/myblogsite/myblogapp/views.py:
import re
from datetime import datetime
from django.shortcuts import render_to_response
from myblogsite.myblogapp.models import Post

MONTH_NAMES = ('', 'January', 'Feburary', 'March', 'April', 'May', 'June', 'July',
               'August', 'September', 'October', 'November', 'December')

def frontpage(request):
    posts, pagedata = init()
    pagedata.update({'subtitle': '',})
    return render_to_response('listpage.html', pagedata)

def singlepost(request, year, month, slug2):
    posts, pagedata = init()
    post = posts.get(date_created__year=year,
                            date_created__month=int(month),
                            slug=slug2,)
    pagedata.update({'post': post})
    return render_to_response('singlepost.html', pagedata)

def yearview(request, year):
    posts, pagedata = init()
    posts = posts.filter(date_created__year=year)
    pagedata.update({'post_list': posts,
                     'subtitle': 'Posts for %s' % year})
    return render_to_response('listpage.html', pagedata)

def monthview(request, year, month):
    posts, pagedata = init()
    posts = posts.filter(date_created__year=year)
    posts = posts.filter(date_created__month=int(month))
    pagedata.update({'post_list': posts,
                     'subtitle': 'Posts for %s %s' % (MONTH_NAMES[int(month)], year),})
    return render_to_response('listpage.html', pagedata)

def tagview(request, tag):
    allposts, pagedata = init()
    posts = []
    for post in allposts:
        tags = re.split(' ', post.tags)
        if tag in tags:
            posts.append(post)
    pagedata.update({'post_list': posts,
                     'subtitle': "Posts tagged '%s'" % tag,})
    return render_to_response('listpage.html', pagedata)

def init():
    posts = Post.objects.all()
    tag_data = create_tag_data(posts)
    archive_data = create_archive_data(posts)
    pagedata = {'version': '0.0.5',
                'post_list': posts,
                'tag_counts': tag_data,
                'archive_counts': archive_data,}
    return posts, pagedata

def create_archive_data(posts):
    archive_data = []
    count = {}
    mcount = {}
    for post in posts:
        year = post.date_created.year
        month = post.date_created.month
        if year not in count:
            count[year] = 1
            mcount[year] = {}
        else:
            count[year] += 1
        if month not in mcount[year]:
            mcount[year][month] = 1
        else:
            mcount[year][month] += 1
    for year in sorted(count.iterkeys(), reverse=True):
        archive_data.append({'isyear': True,
                             'year': year,
                             'count': count[year],})
        for month in sorted(mcount[year].iterkeys(), reverse=True):
            archive_data.append({'isyear': False,
                                 'yearmonth': '%d/%02d' % (year, month),
                                 'monthname': MONTH_NAMES[month],
                                 'count': mcount[year][month],})
    return archive_data

def create_tag_data(posts):
    tag_data = []
    count = {}
    for post in posts:
        tags = re.split(" ", post.tags)
        for tag in tags:
            if tag not in count:
                count[tag] = 1
            else:
                count[tag] += 1
    for tag, count in sorted(count.iteritems(), key=lambda(k, v): (v, k), reverse=True):
        tag_data.append({'tag': tag,
                         'count': count,})
    return tag_data
Templates I made the following template changes:
- I modified the sidebar in
base.html to display an archive index and a tag index. - I replaced
frontpage.html with a more generic listpage.html template used for displaying the frontpage, archives, and tag views. - I added a
singlepost.html template for displaying a single post view. - In all the templates, I created links to navigate among the different views.
~/src/django/myblogsite/templates/base.html:
<!DOCTYPE HTML PUBLIC "-//W3C//DTD HTML 4.01//EN"
"http://www.w3.org/TR/html4/strict.dtd">
<html>
<head>
  <meta http-equiv="Content-Type" content="text/html; charset=utf-8">
  <link rel="stylesheet" type="text/css" href="http://yui.yahooapis.com/2.5.2/build/reset-fonts-grids/reset-fonts-grids.css">
  <link rel="stylesheet" type="text/css" href="/site_media/css/mystyle.css">
  <title>{% block title %}Sofeng's Blog {{ version }}{% endblock %}</title>
</head>

<body>
  <div id="doc" class="yui-t4">

    <div id="hd">
      <h1>
        <img align="center" src="/site_media/image/crane.jpg">
        {% block header1 %}Sofeng's Blog {{ version }}{% endblock %}
      </h1>
      <h2>{% block header2 %}{% endblock %}</h2>
    </div>

    <div id="bd">
      <div id="yui-main">
        <div class="yui-b">
          {% block main %}{% endblock %}
        </div>
      </div>

      <div class="yui-b" id="sidebar">
        {% block sidebar %}
        <h4>ABOUT</h4>
        <p>This is my new blog created using <a href="http://www.djangoproject.com">Django</a>,
          a <a href="http://www.python.org">Python</a> web framework. This site is under
          construction. My current blog is located at:
          <a href="http://iwiwdsmi.blogspot.com">http://iwiwdsmi.blogspot.com</a>.
        </p>
        <br>
        <h4>TAGS</h4>
        {% for line in tag_counts %}
            <a href="/blog/tag/{{ line.tag }}/">{{ line.tag }}</a> ({{ line.count }})<br>
        {% endfor %}
        <br>
        <h4>ARCHIVE</h4>
        {% for line in archive_counts %}
          {% if line.isyear %}
            {% if not forloop.first %}
              <br>
            {% endif %}
              <a href="/blog/{{ line.year }}/">{{ line.year }}</a> ({{ line.count }})<br>
          {% else %}
                <a href="/blog/{{ line.yearmonth }}/">{{ line.monthname }}</a> ({{ line.count }})<br>
          {% endif %}
        {% endfor %}
        <br>
        {% endblock %}
      </div>
    </div>

    <div id="ft">
      Created with <a href="http://www.djangoproject.com/">Django</a>.<br>
      Hosted by <a href="http://www.webfaction.com/">Webfaction</a>.
    </div>
  </div>

</body>
</html>~/src/django/myblogsite/templates/listpage.html:
{% extends "base.html" %}

{% block title %}
  Sofeng's Blog {{ version }}
  {% if subtitle %}:{% endif %}
  {{ subtitle }}
{% endblock %}

{% block header1 %}
  {% if subtitle %}
    <a href="/blog/">Sofeng's Blog {{ version }}</a>
  {% else %}
    Sofeng's Blog {{ version }}
  {% endif %}
{% endblock %}

{% block header2 %}
  {{ subtitle }}
{% endblock %}

{% block main %}
  {% for post in post_list %}
    <h3><a href="/blog/{{ post.date_created|date:"Y/m" }}/{{ post.slug }}/">
        {{ post.title }}</a>
    </h3>
    {{ post.body }}
    <hr>
    <div class="post_footer">
      {% ifnotequal post.date_modified.date post.date_created.date %}
        Last modified: {{ post.date_modified.date }}<br>
      {% endifnotequal %}
      Date created: {{ post.date_created.date }}<br>
      Tags:
      {% for tag in post.get_tag_list %}
        <a href="/blog/tag/{{ tag }}/">{{ tag }}</a>{% if not forloop.last %}, {% endif %}
      {% endfor %}
    </div>
    <br>
  {% endfor %}
{% endblock %}~/src/django/myblogsite/templates/singlepost.html:
{% extends "base.html" %}

{% block title %}
  Sofeng's Blog {{ version }}: {{ post.title }}
{% endblock %}

{% block header1 %}
  <a href="/blog/">Sofeng's Blog {{ version }}</a>
{% endblock %}

{# to fix IE #}
{% block header2 %} {% endblock %}

{% block main %}
    <h3>{{ post.title }}</h3>
    {{ post.body }}
    <hr>
    <div class="post_footer">
      {% ifnotequal post.date_modified.date post.date_created.date %}
        Last modified: {{ post.date_modified.date }}<br>
      {% endifnotequal %}
      Date created: {{ post.date_created.date }}<br>
      Tags:
      {% for tag in post.get_tag_list %}
        <a href="/blog/tag/{{ tag }}/">{{ tag }}</a>{% if not forloop.last %}, {% endif %}
      {% endfor %}
    </div>
    <br>
{% endblock %}urls.pyAs the last step in my bottom-up approach, I modified my urls.py and urls_webfaction.py.
~/src/django/myblogsite/urls_webfaction.py:
from django.conf.urls.defaults import *
from myblogsite.myblogapp.views import *

urlpatterns = patterns(
    '',
    (r'^admin/', include('django.contrib.admin.urls')),
    (r'^myview1/$', myview1),
    (r'^blog/$', frontpage),
    (r'^blog/(\d{4,4})/(\d{2,2})/([\w\-]+)/$', singlepost),
    (r'^blog/(\d{4,4})/$', yearview),
    (r'^blog/(\d{4,4})/(\d{2,2})/$', monthview),
    (r'^blog/tag/([\w\-]+)/$', tagview),
)FinishI uploaded, updated, and restarted the Apache server as usual.
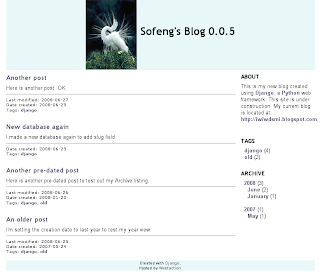
Here is a snapshot screenshot of the site:
The live site is located at:
http://saltycrane.com/blog/ Related posts:
Django Blog Project #1: Creating a basic blog Django Blog Project #2: Deploying at Webfaction Django Blog Project #3: Using CSS and Template Inheritance Django Blog Project #4: Adding post metadata Django Blog Project #5: YUI CSS and serving static media Django Blog Project #7: Adding a simple Atom feed Django Blog Project #8: Adding basic comment functionality 


