These are notes on how I improved the React rendering time of a large table with useMemo, the React Devtools, and consideration of referential equality of my data.
Summary of steps
- Profile using the React Devtools Profiler to find components that are rendering excessively
- Add
memo, useMemo, or PureComponent to prevent the excessive rendering - If using
memo or PureComponent, ensure the props passed in are referentially equal. Something like use-why-did-you-update can help find unexpected inequalities. If using useMemo, ensure the dependencies in the dependency array are referentially equal. Hooks like useMemo and useCallback can help preserve referential equality of props or dependencies. If using Redux, reselect memoizes selectors to prevent excessive referential inequalities. And immutable libraries like immer help preserve referential equality by preserving references to data if the values do not change.
Problem
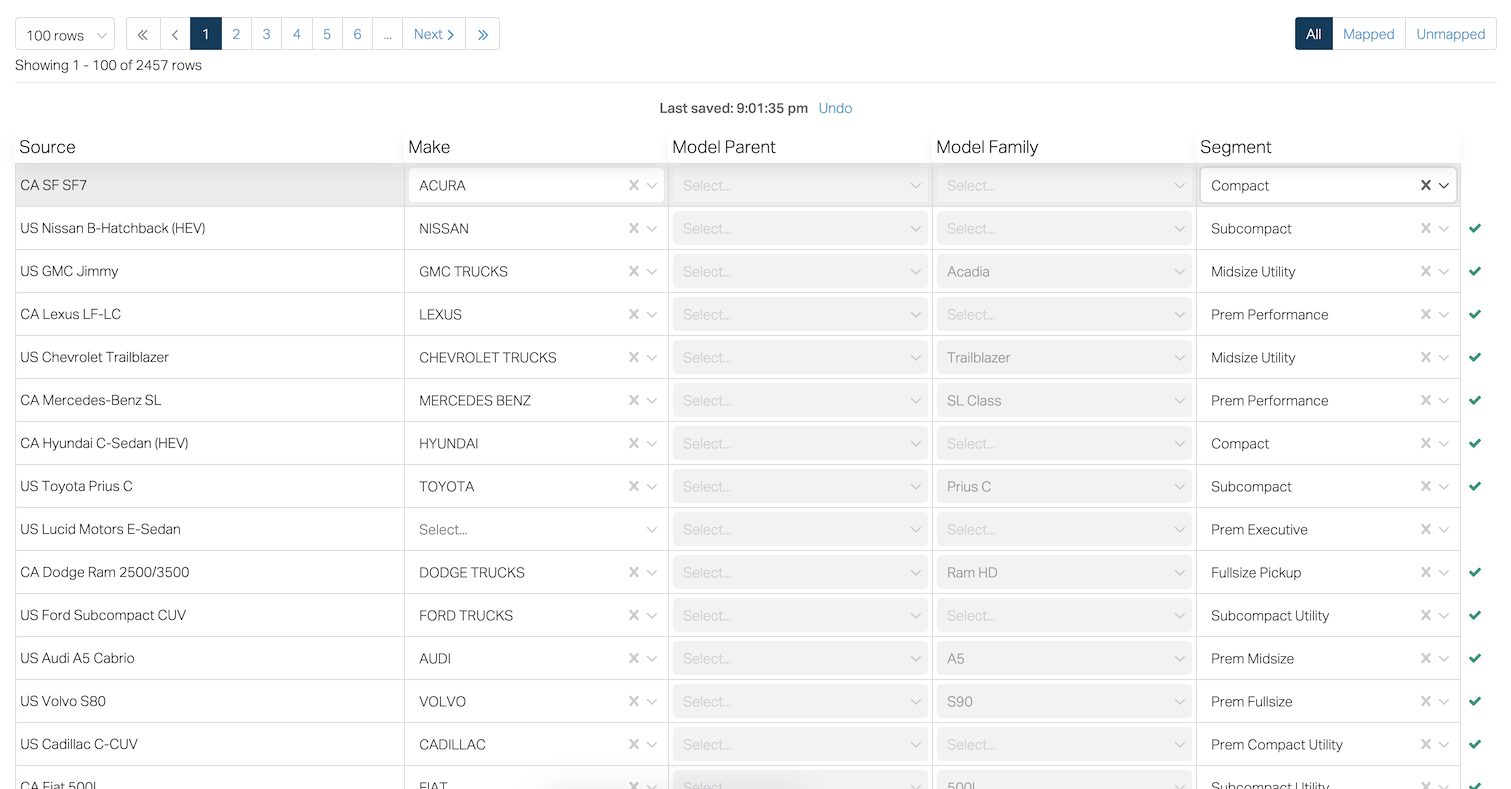
I had a table of 100 rows of select inputs. Changing a select input had a noticeable lag.
React Profiler
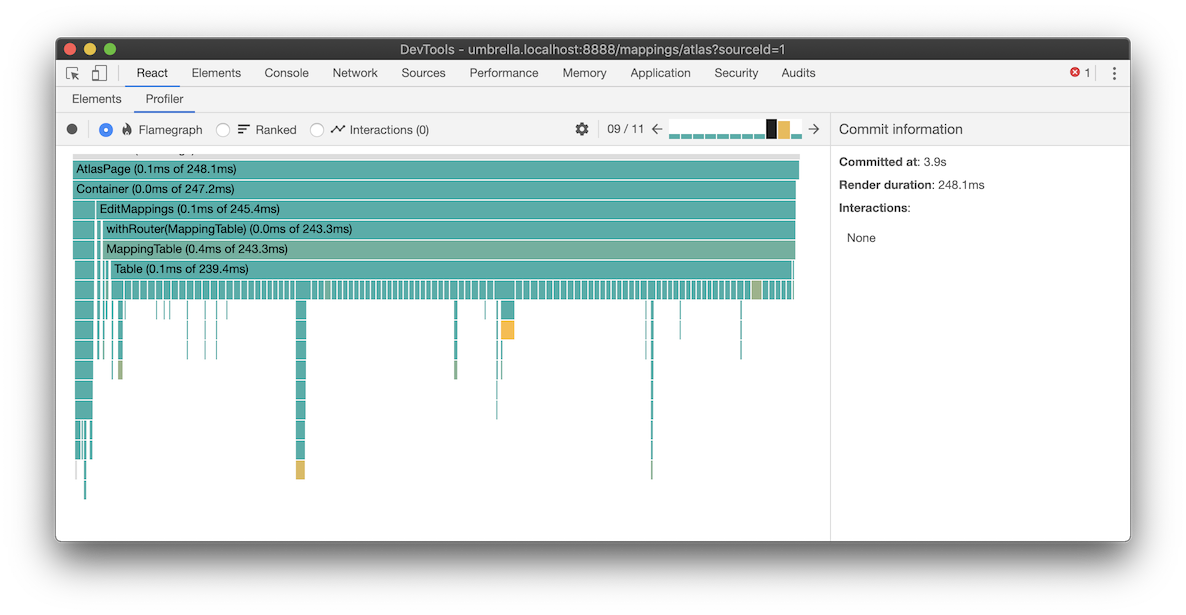
I profiled the table with the Profiler in React Devtools and found that all the rows were re-rendering even though only one of them changed. The screenshot below shows rendering of my Table component took 239ms. All the colored bars beneath the Table means each of the 100 rows are rendering even though only one of them changed. For more information, see this article on how to use the React Profiler.
Row component
The table was built using React hooks and I sprinkled useMemo liberally in my code. Most of my data was memoized, but React was still re-rendering. Here is my row component:
const MappingRow = ({ id }) => {
  // ...
  const mapping = useMapping(state, id);
  const enabled = useEnabledFields(state, id);
  const { makeOptions, modelFamilyOptions, modelParentOptions, segmentOptions } = useMappingRowApis(id);

  const handleChange = field => selected => {
    const value = selected && selected.value;
    if (value === mapping[field]) {
      return;
    }
    const update = { [field]: value };
    dispatch({
      type: "save_mapping",
      promise: saveMapping(id, update),
      id,
      timeSaved: Date.now(),
      update,
    });
  };

  return (
    <tr>
      <Cell>{mapping.source}</Cell>
      <SelectCell
        isDisabled={!enabled.mappableMakeName}
        onChange={handleChange("makeCode")}
        options={makeOptions}
        value={mapping.makeCode}
      />
      <SelectCell
        isDisabled={!enabled.mappableModelParent}
        onChange={handleChange("modelParentId")}
        options={modelParentOptions}
        value={mapping.modelParentId}
      />
      <SelectCell
        isDisabled={!enabled.mappableModelFamilyName}
        onChange={handleChange("modelFamilyName")}
        options={modelFamilyOptions}
        value={mapping.modelFamilyName}
      />
      <SelectCell
        isDisabled={!enabled.mappableSegmentName}
        onChange={handleChange("segmentCode")}
        options={segmentOptions}
        value={mapping.segmentCode}
      />
    </tr>
  );
};
memo HOC
Even though the data provided by my custom hooks was memoized, I realized I still needed to apply React's memo higher order component (HOC) to prevent re-rendering. I extracted out a new MemoizedRow component, so that I could wrap it with React's memo HOC. (Note: if this seems undesirable to you, see the end of this post.)
const MappingRow = ({ id }) => {
  // ...
  const mapping = useMapping(state, id);
  const enabled = useEnabledFields(state, id);
  const { makeOptions, modelFamilyOptions, modelParentOptions, segmentOptions } = useMappingRowApis(id);
  const handleChange = field => selected => {
    // ...
  };

  return (
    <MemoizedRow
      enabled={enabled}
      handleChange={handleChange}
      makeOptions={makeOptions}
      mapping={mapping}
      modelFamilyOptions={modelFamilyOptions}
      modelParentOptions={modelParentOptions}
      segmentOptions={segmentOptions}
    />
  );
};

const MemoizedRow = memo(props => {
  const {
    enabled,
    handleChange,
    makeOptions,
    mapping,
    modelFamilyOptions,
    modelParentOptions,
    segmentOptions,
    sourceConfig,
  } = props;
  return (
    <tr>
      <Cell>{mapping.source}</Cell>
      <SelectCell
        isDisabled={!enabled.mappableMakeName}
        onChange={handleChange("makeCode")}
        options={makeOptions}
        value={mapping.makeCode}
      />
      <SelectCell
        isDisabled={!enabled.mappableModelParent}
        onChange={handleChange("modelParentId")}
        options={modelParentOptions}
        value={mapping.modelParentId}
      />
      <SelectCell
        isDisabled={!enabled.mappableModelFamilyName}
        onChange={handleChange("modelFamilyName")}
        options={modelFamilyOptions}
        value={mapping.modelFamilyName}
      />
      <SelectCell
        isDisabled={!enabled.mappableSegmentName}
        onChange={handleChange("segmentCode")}
        options={segmentOptions}
        value={mapping.segmentCode}
      />
    </tr>
  );
});
Referential equality or shallow equality
I applied the memo HOC, but profiling showed no change in performance. I thought I should useWhyDidYouUpdate. This revealed some of my props were not equal when I expected them to be. One of them was my handleChange callback function. This function is created every render. The reference to the function from one render does not compare as equal to the reference to the function in another render. Wrapping this function with useCallback memoized the function so it will compare equally unless one of the dependencies change (mapping or id).
const MappingRow = ({ id }) => {
  //...

  const handleChange = useCallback(
    field => selected => {
      const value = selected && selected.value;
      if (value === mapping[field]) {
        return;
      }
      const update = { [field]: value };
      dispatch({
        type: "save_mapping",
        promise: saveMapping(id, update),
        id,
        timeSaved: Date.now(),
        update,
      });
    },
    [mapping, id],
  );

  return (
    <MemoizedRow
      enabled={enabled}
      handleChange={handleChange}
      makeOptions={makeOptions}
      mapping={mapping}
      modelFamilyOptions={modelFamilyOptions}
      modelParentOptions={modelParentOptions}
      segmentOptions={segmentOptions}
    />
  );
};
Another problem was my mapping data object was changing for every row even though I only actually changed one of the rows. I was using the Immer library to create immutable data structures. I had learned that using immutable data structures allows updating a slice of data in an object without changing the reference to a sibling slice of data so that it would compare equally when used with the memo HOC or PureComponent. I had thought my data was properly isolated and memoized, however there was one piece of my state that was breaking the memoization. Here is my code to return a single mapping data object for a row:
export const useMapping = (state, id) => {
  const {
    optimisticById,
    optimisticIds,
    readonlyById,
    writableById,
  } = state.mappings;
  const optimisticMapping = optimisticById[id];
  const readonlyMapping = readonlyById[id];
  const writableMapping = writableById[id];
  return useMemo(() => {
    const mapping = { ...readonlyMapping, ...writableMapping };
    return optimisticIds.includes(id)
      ? { ...mapping, ...optimisticMapping }
      : mapping;
  }, [id, optimisticIds, optimisticMapping, readonlyMapping, writableMapping]);
};
The optimisticIds state was used to store a list of ids of mapping items that had been updated by the user, but had not yet been saved to the database. This list changed whenever a row was edited, but it was used in creating the mapping data for every row in the table. The optimisticIds is in the useMemo dependency array, so when it changes, the mapping data is re-calculated and a new value is returned. The important part is not that running the code in this function is expensive. The important part is that the function returns a newly created object literal. Like the handleChange function created in the component above, object literals created at different times do not compare equally even if the contents of the object are the same. e.g. The following is not true in JavaScript: {} === {}. I realized I did not need the optimisticIds state, so I removed it. This left a memoized function that only recalculated when data for its corresponding row in the table changed:
export const useMapping = (state, id) => {
  const { optimisticById, readonlyById, writableById } = state.mappings;
  const optimisticMapping = optimisticById[id];
  const readonlyMapping = readonlyById[id];
  const writableMapping = writableById[id];
  return useMemo(() => {
    const mapping = { ...readonlyMapping, ...writableMapping };
    return optimisticMapping ? { ...mapping, ...optimisticMapping } : mapping;
  }, [optimisticMapping, readonlyMapping, writableMapping]);
};
20X improvement
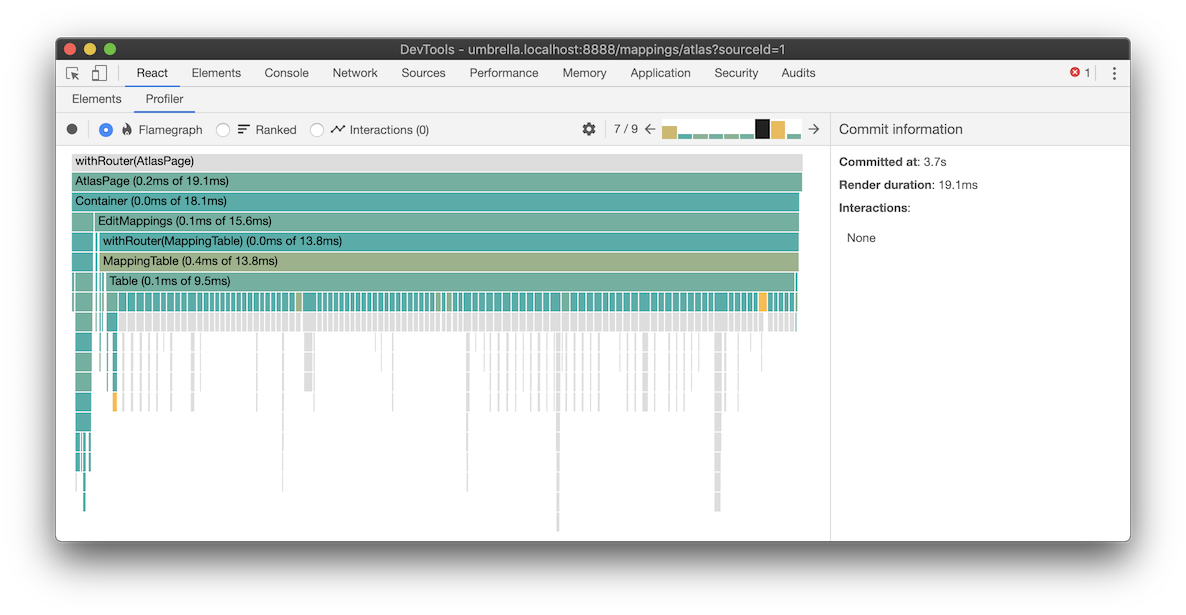
After fixing these referential inequalities, the memo HOC eliminated the re-rendering of all but the edited row. The React profiler now showed the table rendered in 10ms, a 20X improvement.
Refactoring to useMemo
To use the memo HOC, I had to extract out a separate component for the sole purpose of applying the memo HOC. I started to convert the HOC to a render prop so I could use it inline. Then I thought, aren't hooks supposed to replace most HOCs and render props? Someone should make a useMemo hook to do what the memo HOC does. Wait there is a useMemo hook already... I wonder if...
const MappingRow = ({ id }) => {
  const mapping = useMapping(id);
  const enabled = useEnabledFields(id);
  const { makeOptions, modelFamilyOptions, modelParentOptions, segmentOptions } = useMappingRowApis(id);

  const handleChange = useCallback(
    field => selected => {
      const value = selected && selected.value;
      if (value === mapping[field]) {
        return;
      }
      const update: MappingUpdate = { [field]: value };
      dispatch({
        type: "save_mapping",
        promise: saveMapping(id, update),
        id,
        timeSaved: Date.now(),
        update,
      });
    },
    [dispatch, mapping, id],
  );

  return useMemo(
    () => (
      <tr>
        <Cell>{mapping.source}</Cell>
        <SelectCell
          isDisabled={!enabled.mappableMakeName}
          onChange={handleChange("makeCode")}
          options={makeOptions}
          value={mapping.makeCode}
        />
        <SelectCell
          isDisabled={!enabled.mappableModelParent}
          onChange={handleChange("modelParentId")}
          options={modelParentOptions}
          value={mapping.modelParentId}
        />
        <SelectCell
          isDisabled={!enabled.mappableModelFamilyName}
          onChange={handleChange("modelFamilyName")}
          options={modelFamilyOptions}
          value={mapping.modelFamilyName}
        />
        <SelectCell
          isDisabled={!enabled.mappableSegmentName}
          onChange={handleChange("segmentCode")}
          options={segmentOptions}
          value={mapping.segmentCode}
        />
      </tr>
    ),
    [
      enabled,
      handleChange,
      mapping,
      makeOptions,
      modelParentOptions,
      modelFamilyOptions,
      segmentOptions,
    ],
  );
};
Yes applying useMemo to the returned JSX element tree had the same effect as applying the memo HOC without the intrusive component refactor. I thought that was pretty cool. Dan Abramov tweeted about wrapping React elements with useMemo also: